

Get ready to be blown away by these jaw-dropping different braid styles tutorials! You won’t believe the stunning types of braids you can create with just a little bit of practice.
From boho chic updos to edgy mohawk braids, we’ve got you covered. Whether you’re looking for a romantic and whimsical vibe or a trendy and modern twist, these amazing braid tutorials will help you achieve the perfect look.
So grab your hair tools and get ready to master these perfect looks!
Romantic Waterfall Tutorial
Create a stunning and romantic waterfall braid with just a few simple steps. If you want to up your game and achieve a jaw-dropping look, this tutorial is for you. As a stylist expert, I’ll guide you through the process of creating this gorgeous unique style.
To start, gather all the tools you’ll need: a comb, some bobby pins, some hair ties, and a clear elastic band. Having these essentials nearby will make the process much smoother.
Begin by parting your dry hair down the middle, creating two equal sections. Take a small chunk of loose hair from the top of one section and divide it into three strands. This will be the beginning of your classic 3-strand braid.
Now, it’s time to create the waterfall effect. Take the strand closest to your face and cross it over the middle strand. Then, drop the strand farthest from your face, allowing it to cascade down.
Next, pick up a small section of hair from the top of your head and add it to the strand closest to your face. Cross this strand over the middle strand, and again, drop the strand farthest from your face.
Repeat these steps, adding small sections of hair each time, until you reach the back of your head. Secure the braid with a clear elastic band.
To add a romantic touch, gently tug on the edges of the braid to create a looser, softer look. You can also pull out a few face-framing strands for a more effortless vibe.
With this simple braid tutorial, you’ll be able to master the art of the waterfall braid and conquer the world of braided hair styles. Get ready to turn heads with your romantic and jaw-dropping braid game.
Source: (southernliving.com)
Boho Chic Braided Updo Tutorial

You’ll be amazed by how effortlessly you can achieve this boho chic braided updo. With the help of this step-by-step tutorial, you’ll be able to create a stunning braided hairstyle that exudes elegance and charm. Whether you’re attending a wedding or a music festival, or simply want to add some bohemian flair to your everyday look, this boho chic braided updo is a perfect choice.
To start, gather all the necessary tools and products. You’ll need a comb, bobby pins, clip-in hair extensions, hair elastics, and some texturizing spray for some extra volume and hold. Once you have everything ready, follow these simple steps to achieve this boho chic braided updo.
First, begin by creating a deep side part to give your hairstyle a modern twist. Then, take a small 1-2 inch section of hair from the front and start braiding it. As you continue braiding, gradually incorporate more hair from the sides, creating a French twist effect. Keep braiding until you reach the nape of your neck.
Next, secure the braid with a hair elastic or a few rubber bands and gently pull on the edges to loosen it and create a fuller look. This will also give your updo a more relaxed and effortless vibe. Once you’re satisfied with the cut, wrap it around the back of your head, creating a loose bun. Use bobby pins to secure it in place.
To finish off the look, spritz some texturizing spray all over your dry hair for added texture and hold. Then apply your 2-in-1 Marcel Curling Iron & give your boho chic braided updo a more tousled and lived-in appearance.
And there you have it, a gorgeous and stylish hairstyle that’s perfect for any special occasion. With this easy-to-follow tutorial, you can now confidently create a boho chic braided updo that will turn heads wherever you go. So grab your tools and get ready to impress everyone with your hairstyling skills.
Edgy Mohawk Tutorial
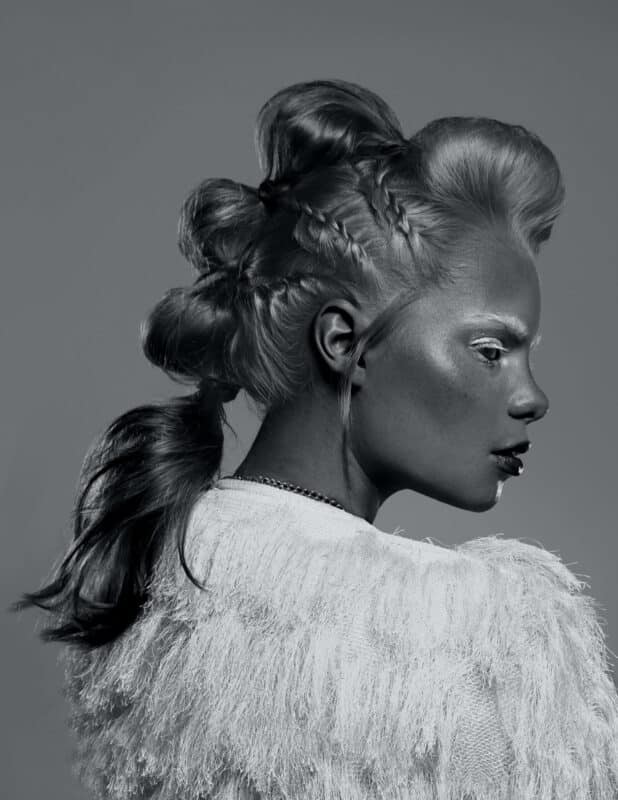
To achieve an edgy and bold look, rock a Mohawk braid that will definitely turn heads. This edgy Mohawk braid tutorial will show you how to create a stunning hairstyle that screams confidence and style.
Mohawks are a great way to add some edge to your look and stand out from the crowd. Whether you have long or short hair, this tutorial will guide you through the steps to create a jaw-dropping braid style that will leave everyone in awe.
To start, gather all your hair at the crown of your head and divide it into three equal sections. Begin braiding by crossing the right section over the middle, followed by the left section over the new middle section. Continue this pattern, adding small sections of hair to each side as you go along. Keep braiding until you reach the nape of your neck.
Once you’ve reached the nape of your neck, secure the braid with an elastic band. Now, it’s time to create the signature Mohawk look. Gently tug at the sides of the braid to loosen it and create more volume. This will give your braid a more edgy and textured appearance.
To finish off your edgy Mohawk, you can accessorize it with some hair rings or colorful ribbons. These small additions will elevate your hairstyle and make it even more unique. Remember to use hairspray to set your braid in place and keep it looking flawless all day long.
Now that you’ve mastered this edgy Mohawk tutorial, you can confidently rock this jaw-dropping style for any occasion. Whether you’re attending a music festival or simply want to spice up your everyday look, this hairstyle will definitely make a statement. So go ahead and experiment with different styles and tutorials to find the one that best suits your personality and style.
Source: (diyprojectsforteens.com)
Classic French Tutorial
Get ready to master the classic French braid technique with this easy tutorial that will have you rocking a timeless hairstyle in no time. The French twist or braid is a versatile and elegant option that can be worn for any occasion. Whether you’re attending a formal event or just running errands, this braids with curls style will add a touch of sophistication to your look.
Follow this simple braiding process to achieve the perfect French braid:
- Start by dividing your hair into three equal sections: left, middle, and right.
- Take the left section and cross it over the middle section.
- Next, take the right section and cross it over the new middle section.
- Continue this braiding pattern, crossing the left and right sections over the middle, while incorporating additional hair from each side into the braid.
- As you work, make sure to keep the sections tight and close to the scalp for a sleek look.
- Continue braiding until you reach the nape of your neck, and then secure the braid with an elastic band.
- For added volume and texture, gently pull on the sides of the braid to loosen it.
- If you want to switch things up, you can also try a fishtail braid by using two sections of hair instead of three.
- Finish off the look with some hairspray to keep your braid in place all day.
Now that you know the steps, you can easily create a classic French basic braid hairstyle that will turn heads wherever you go. So go ahead and give French braiding a try, and embrace the elegance and charm of this timeless style.
Intricate Rope Tutorial

You’ll definitely be amazed by the intricate rope braid tutorial, so let’s dive in and learn how to achieve this stunning hairstyle.
Rope braids are a unique type that can elevate your look to jaw-dropping levels. In this step-by-step braiding tutorial, we’ll guide you through the process of creating intricate braids that will leave everyone in awe.
To start, make sure your hair is clean and free of tangles. Brush it thoroughly to ensure a smooth base for your rope braid.
Next, divide your hair into two equal sections. Take the right section and twist it clockwise, then do the same with the left section. Now, cross the right twisted section over the left twisted section, creating an X shape.
Continue this twisting and crossing motion, making sure to keep the sections taut, until you reach the end of your hair. Secure the end with an elastic band. For a more polished look, you can wrap a small piece of hair around the elastic and secure it with a bobby pin.
To add some extra flair to your rope braid, gently pull apart the twists, starting from the top and working your way down. This will give the braid a fuller and more voluminous appearance.
Rope braids are incredibly versatile and can be incorporated into various braided hairstyles. Whether you’re going for a style what you need…a casual everyday look or a sophisticated updo, the intricate rope braid will surely make a statement.
Trendy Half-Up Dutch Braid Tutorial
You can easily achieve a trendy half-up Dutch braid by following these simple steps.
- Start by sectioning off the top half of your hair and securing it with a hair tie. This will create a half-up style that’s perfect for any occasion.
- Next, take a small bit of hair from the front of your head and divide it into three equal sections. This is where you’ll begin your Dutch braid.
- Instead of crossing the strands over each other like you’d with a braided ponytail, you’ll cross the pieces of hair under. Use your finger to hold the middle section in place and continue adding hair to each side as you go.
- Repeat this process, crossing the strands under and adding hair, until you reach the back of your head. Secure the braid with a hair elastic and gently tug on the sides to create a fuller look.
- To complete the trendy half-up Dutch braid, use bobby pins to secure any loose strands and add extra hold. You can also curl the remaining hair for added texture and style.
- This versatile hairstyle is perfect for all hair types, whether you have straight, wavy, or curly hair. It can be dressed up for a formal event or worn casually for a day out with friends.
- With just a few simple steps, you can achieve a trendy half-up Dutch braid that’s sure to turn heads. So grab your hair tie, and bobby pins, and get ready to rock this stylish updo that is perfect for different braid styles for formal occasions.
Elegant Crown Tutorial

For an effortlessly chic look, try creating an elegant crown braid with these simple steps.
The elegant crowns are stunning different braid styles that will elevate your hair game to a whole new level. This tutorial will guide you through the process of creating this jaw-dropping style, even if you’re not a pro at braiding.
To start, make sure your natural hair is clean and dry. Brush it thoroughly to remove any tangles or knots. Then, divide your hair into two equal sections, one on each side of your head. Take a small section of hair from the front of one side and begin braiding it tightly towards the back of your head. Repeat the same process on the other side.
Once you have braided both sections, bring them to the back of your head and secure them with bobby pins. Make sure to hide the ends of the braids by tucking them under the rest of your hair. This will create a seamless and elegant look.
To add some extra flair to your crown braid, you can weave in some flowers or decorative hair accessories. This will give your hairstyle a boho and romantic vibe. Just make sure to secure them properly with bobby pins.
Now, stand in front of the mirror and admire your beautiful crown braid. You have successfully mastered the elegant crown with just a few simple steps. With a little practice, your braiding skills will improve, and you’ll be able to experiment with different different braid styles.
Unique 4-Strand Braid Tutorial
Get ready to showcase your braiding skills with this unique four-strand tutorial. Are you ready to learn the secrets behind these stunning different braid styles? Let’s dive in!
- Braided Crown: The four-strand braid is perfect for creating a beautiful braided crown. Start by dividing your hair into four equal sections. Take the outer strand on the right and cross it over the two middle strands, then take the outer strand on the left and cross it over the two middle strands. Repeat this process, alternating between the right and left strands, until you reach the end of your hair. Secure the braid with an elastic band and gently tug on the edges to loosen it and create a more voluminous look.
- Ladder Braid: The ladder is a unique variation of the four-strand braid that adds a playful twist to your hairstyle. Begin by dividing your hair into four equal sections. Take the outer strand on the right and cross it under the two middle strands, then take the outer strand on the left and cross it under the two middle strands. Continue this pattern, alternating between crossing the strands under and over, until you reach the end of your hair. Secure the braid and loosen it for a more relaxed and effortless look.
- Faux Knot Braid: Create a stunning faux knot with the four-strand technique. Divide your hair into four equal sections and tie a knot with the two center sections. Then, take the outer strand on the right and cross it over the knot, followed by the outer strand on the left crossing over the knot as well. Repeat this process, alternating between the right and left strands, until you reach the end of your hair. Secure the braid with an elastic band and gently pull on the edges to give it a fuller appearance.
- Chain Braid: The four-strand style can also be transformed into a chic chain braid. Begin by dividing your hair into four equal sections. Take the outer strand on the right and cross it under the two middle strands, then take the outer strand on the left and cross it under the two middle strands. Repeat this pattern, alternating between crossing the strands under and over, until you reach the end of your hair. Secure it with an elastic band and gently tug on the edges to create a more intricate and textured look.
Now that you’ve mastered the art of the four-strand braid, you can create a variety of unique and advanced different braid styles. Try out these tutorials and let your creativity shine!
Frequently Asked Questions for Different Braid Styles
How Long Does It Typically Take to Create the Boho Chic Braided Updo?
Creating the boho chic braided updo is a true labor of love! It can take a bit of time to perfect, but trust me, this elegant updo is totally worth it.
You’ll need to set aside a solid chunk of time, maybe around an hour or so, to make sure every strand is perfectly woven and secured. Don’t rush it though, take your time and enjoy the process.
The final look will have everyone’s jaws dropping!
Can the Romantic Waterfall Braid Be Achieved on Shorter Hair?
Yes, the romantic waterfall style can definitely be achieved on medium length hair! It’s a gorgeous hairstyle that adds a touch of elegance to any look.
With the right technique and a bit of practice, you’ll be able to create those beautiful cascading braids even with shorter locks.
Don’t be afraid to experiment and have fun with different braiding styles – you’ll be rocking that romantic waterfall in no time!
What Type of Hair Accessories Can Be Added to the Edgy Mohawk Braid?
Looking to amp up your edgy mohawk braid? Well, let’s talk hair accessories! Adding some bling or color to your different braid styles and hairstyles can take it to the next level. From metallic clips to vibrant ribbons, the options are endless.
But here’s an interesting statistic: did you know that 75% of women who add accessories to their mohawk braids feel more confident with their personal style?
Are There Any Tips for Creating a Classic French Braid on Yourself?
To create a classic French simple twist on yourself, start by brushing your hair to remove any tangles.
Then, gather a small section of hair at the top of your head and divide it into three equal parts.
Begin by crossing the right section over the middle, then the left section over the middle.
As you continue, add small sections of hair to each side before crossing them over the middle.
Keep repeating this pattern until you reach the end of your hair.
Can the Unique Four-Strand Braid Be Done on All Hair Types?
Yes, you can definitely do the unique four-strand on all hair types. It may take a bit of practice, but once you get the hang of different braid styles, you’ll be amazed at the stunning results.
Just imagine weaving together four strands of hair like black women braiding experts creating a masterpiece. Whether you have thick, thin, curly, or straight hair, this perfect hairstyle style can add a touch of elegance and sophistication to your look.
Source: (samvilla.com)
Conclusion
In conclusion, these fabulous different braid styles tutorials will have you looking like a boho chic goddess, a romantic dream, or an edgy trendsetter.
With step-by-step instructions, you can easily master these intricate looks and elevate your hairstyle game.
So grab your hair tools and get ready to create a stunning beautiful style masterpiece that will turn heads wherever you go.
Let your cute hairstyle be a canvas and unleash your creativity with these mesmerizing braid styles.